Important: You do not need to migrate from Workflow 8.3 to Workflow 9.0. More information.
You can migrate your Workflow 8.0 workflows to Workflow 9.0 using the Migration Utility. Migrating your workflows allows you to use your 8.0 workflows in Workflow 9.0. The Workflow Migration Utility will guide you through the migration process and will convert the activities and rules in your 8.0 workflows to their 8.3 equivalents.
Important: We recommend that you run the Migration Planning Wizards before following the migration steps below.
The Migration Utility allows you to migrate workflow components separately. For example, you can migrate workflow settings separately from starting rules and workflows, or you can migrate starting rules individually. You can also migrate workflow definitions separately from their starting rules so that you can test any scripts or custom activities without affecting your repositories.
During the migration process, existing workflow instances will continue to run on your Workflow 8.0 Server, and after migration completes, new instances will run on the Workflow 9.0 Server. Your Workflow 8.0 and Workflow 9.0 Servers will use separate SQL databases so currently running workflow instances will not be affected during migration.
Important: You should not uninstall Workflow 8.0 until all starting rules have been migrated and all workflow instances have completed on the Workflow 8.0 Server.
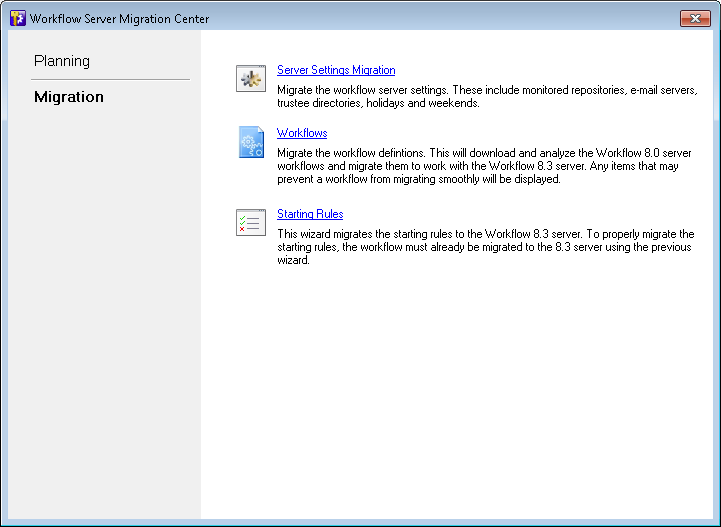
Migrating your Workflow Server from 8.0 to 9.0
The migration process has three components: Server Settings migration, Workflow migration, and Starting Rule migration. We recommend that you complete these components in this order, but you do not need to complete all the components at once.
Example: Sue migrated her Server settings and workflows on one day. She then tested her migrated workflows on the 9.0 Server and reconfigured them as needed. As she finished testing each workflow, she migrated its starting rules one by one, spreading the process out over the course of a week.
- In the Workflow Server Migration Center, click Migration (in the menu on the left). The
 three wizards on the right will guide you through the migration process.
 - Run the Server Settings Migration Wizard to migrate Workflow Server settings such as monitored repositories, e-mail servers, trustee directories, holidays, and weekends.
- Click Server Settings Migration to open the wizard.
- Under Select a Workflow 9.0 Server, type the name of your Workflow 9.0 Server if it is not already entered there.
- Click Validate.
- A progress bar will appear as the utility finds the 8.0 monitored repositories, e-mail servers, and trustee directories. You can select the Show Details link to see the process and components the wizard went through to find and analyze the settings. (If this step happens quickly, you can click Back on the next screen to return to the progress bar and details.)
- Your 8.0 repositories, e-mail servers, and trustee directories will be listed under Settings and their Statuses will appear next to them. Click each setting to view more details about it and any warnings.
- Optional: You can organize your settings by Action, Setting name, Type, or Status by clicking the column headers.
- In the Action column, select the checkboxes next to the settings you want to migrate. Clear the checkboxes next to the settings you do not want to migrate.
- Optional: To see settings that have already been migrated, right-click the list and select Show already migrated items.
- Click Next.
- A list of the migrated items will appear. Click View Migration Log to see the details of the migration. You can organize your settings by Setting name, Type, or Status by clicking the column heading.
- Click Finish.
- Run the Workflows Migration Wizard to migrate workflow definitions from their 8.0 versions to their 9.0 versions.
- In the Workflow Server Migration Center, click Workflows to open the wizard.
- Under Select a Workflow 9.0 Server, type the name of your Workflow 9.0 Server if it is not already entered there.
- Click Validate.
- A progress bar will appear as the utility finds the 8.0 workflows. You can select the Show Details link to see the process and components the wizard went through to find and analyze the workflows. (If this step happens quickly, you can click Back on the next screen to return to the progress bar and details.)
- A list of the workflows you can migrate will appear along with their statuses and any alerts. Click each workflow to see any more details about the workflow and any alerts.
- Optional: You can organize the listed workflows by if they will be migrated, by Status, by Workflow Name, or by Alerts by clicking the column headers.
- In the Migrate column, select the checkboxes next to the workflows you want to migrate and publish. Clear the checkboxes next to the workflows you do not want to migrate.
- Optional: To see workflows that have already been migrated, right-click the list and select Show already migrated workflows.
- Click Next, to migrate and publish the selected workflows.
- After the progress bar completes, a list of the migrated workflows will appear. Click View Migration Log to see the details of the workflows' migration. Click the status link next to each workflow to see details about the workflow's status. You can organize your workflows by Name, Type, or Status by clicking the column headers.
- Click Finish.
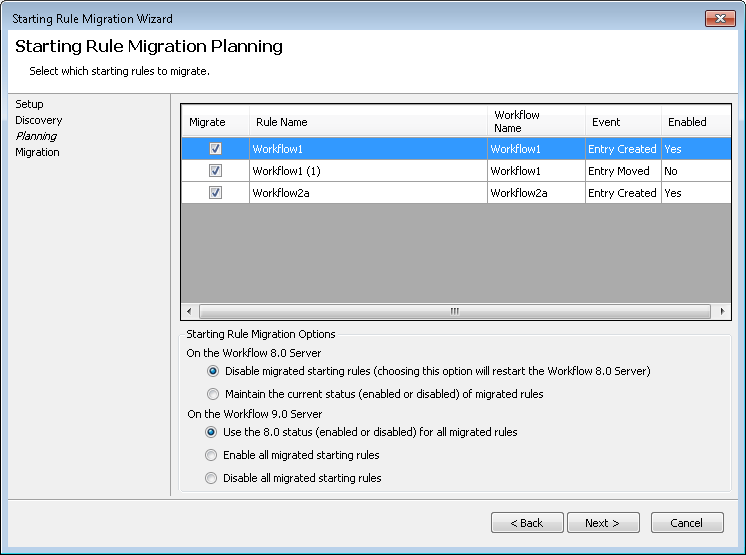
- Run the Starting Rules Migration Wizard to migrate starting rules from their 8.0 versions to their 9.0 versions.
- In the Workflow Server Migration Center, click Starting Rules to open the wizard.
- Under Select a Workflow 9.0 Server, type the name of your Workflow 9.0 Server if it is not already entered there.
- Click Validate.
- A progress bar will appear as the utility finds the 8.0 starting rules. You can select the Show Details link to see the process and components the wizard went through to find and analyze the starting rules. (If this step happens quickly, you can click Back on the next screen to return to the progress bar and details.)
- A list of the starting rules you can migrate will appear along with the workflow each rule is associated with, the rule's starting event, and if the rule is enabled or disabled. You can organize the listed starting rules by if they will be migrated, by Rule Name, by Workflow Name, by starting Event, or by if they are enabled by clicking the column headers.
- Below the list of starting rules, configure the status for all migrated starting rules.
- Select to Disable all migrated rules or to Maintain the current status (enabled or disabled) of all migrated rules on the Workflow 8.0 Server. We recommend disabling all migrated rules on the Workflow 8.0 Server so that the rules do not interfere with rules on the Workflow 9.0 Server and so that all new workflow instances start on the 9.0 Server. If you choose to maintain the current status of all migrated rules, the rules will be disabled on the Workflow 9.0 Server to prevent interference.
- If you select to Disable all migrated rules on the Workflow 8.0 Server, you can configure the status for the migrated rules on the Workflow 9.0 Server. Choose to
- Use the 8.0 status (enabled or disabled) for all migrated rules on the Workflow 9.0 Server. We recommend having the migrated rules keep the same status as they had on the 8.0 Server so that the rules that were enabled and running on the Workflow 8.0 Server will continue to run on the Workflow 9.0 Server.
- Enable all migrated rules on the Workflow 9.0 Server. This option will enable all migrated rules, even rules that were disabled on the Workflow 8.0 Server.
- Disable all migrated rules on the Workflow 9.0 Server. You can manually enable the rules after reviewing them in the Workflow 9.0 Designer's Rule Manager or Workflow 9.0 Administration Console's Starting Rules node.
- In the Migrate column, select the checkbox next to the starting rules you want to migrate and clear the checkbox next to the starting rules you do not want to migrate.
- Optional: To see starting rules that have already been migrated, right-click the list and select Show already migrated starting rules.
- Click Next.
- The selected starting rules will be published. After the progress bar completes, a list of the migrated starting rules will appear. Click View Migration Log to see the details of the starting rules' migration. Click the status link next to each rule to see details about the rule's status. You can organize your starting rules by Name, Type, or Status by clicking the column headers.
- Click Finish.
Note: If you are running a Team or United Laserfiche Server, your repository will show a warning indicating that it requires a license. You can add a license to your Workflow 9.0 Server in the Licenses node of the Workflow Administration Console.
Tip: You can migrate all settings by right-clicking on the list and selecting Select all. To not migrate any settings, right-click the list and select Clear all.
Note: Not all workflows need to be migrated at once. You can migrate workflows at whatever pace you need without affecting the workflows running on the Workflow 8.0 or Workflow 9.0 Server.
Example: You may be alerted to review Script activities to see if any of their code will be affected by the migration, or you may be alerted that a Repeat, Conditional Parallel, or Conditional Decision activity has a user name condition that is not supported in Workflow 9.0.
Note: Custom e-mail servers configured for activities will not be migrated.
Tip: You can migrate all workflows by right-clicking on the list and selecting Select all. To not migrate any workflows, right-click the list and select Clear all.
Note: Migrated workflows will not run on the 9.0 Server until you have given them a new starting rule, you have migrated their existing starting rule, or they are invoked by another workflow.
Note: You cannot have the same starting rule enabled on both the Workflow 8.0 Server and the Workflow 9.0 Server, so you must choose which Server the rule will be enabled on, if any.
Note: Choosing to Disable all migrated rules will restart the Workflow 8.0 Server.
Tip: You can migrate all starting rules by right-clicking on the list and selecting Select all. To not migrate any starting rules, right-click the list and select Clear all.